


let's go! GRAND summer fun! (week six) let's explore, move, play & create!
- Jul 17, 2025
- 9 min read
Updated: Aug 20, 2025
Thursday, July 17, 2025

Do you 🖤 flip flops like we 🖤 flip flops?
They are definitely one of our #1 summer essentials!
We can hardly believe that July is past its midpoint already
and we’re savoring all the memory making moments we can!
Thanks for taking time out of your day to stop by and visit!
If you are a GRAND (like the two of us)
and you’re looking for simple, fun and creative ways to connect with your grandkids,
you’ve come to the right place!
Or perhaps you’re a parent or caregiver who needs to fill a few
of the endless hours that come with kids home during the summer…
We’ve got you covered, too!

We’re having such fun each week
sharing the kinds of activities we love to do with the special Littles in our lives.
We’re always on the hunt for experiences that are easy to put together,
won’t break the bank or create clutter
and ones that can be adapted to challenge different ages!
Most of all, we want to provide activities that will be engaging for our Littles!
If there’s an opportunity to learn something new,
that’s the icing on the cake!
In fact, we, as GRANDS, often learn just as much as the young ones do!
Today, we’re back with Week Six and this brand new post
filled with GRAND Summer Fun!

This week’s featured ideas include…
LET’S EXPLORE! Cloud Dough!
LET’S MOVE! - Paper Cup Bowling!
LET’S PLAY! A Simple Card Game!
LET’S CREATE - Nail Art!
And, of course, you’ll find a few Instagram FAVES sprinkled in, too!
LET’S GO!

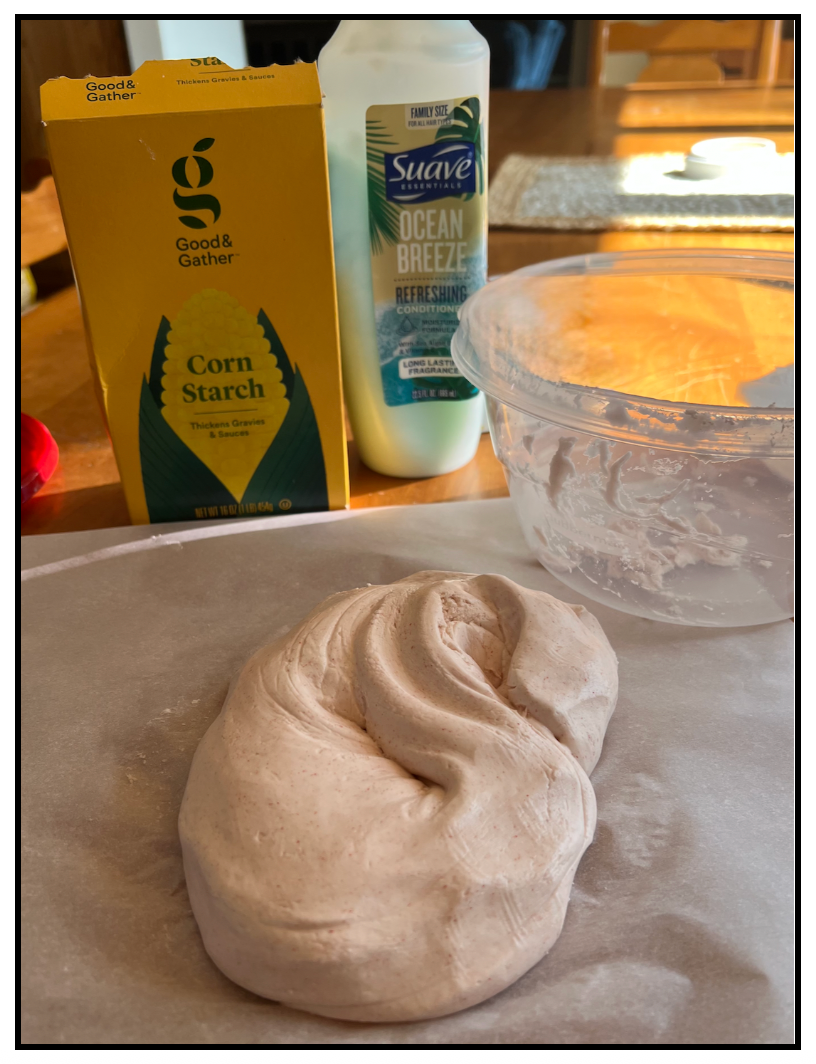
Laura is sharing this fun alternative to playdough,
and you’ll only need two ingredients to make it yourself!

I’m headed to Wisconsin later next week to hang out with my Littles
and the ingredients for this fun dough will definitely be in my GRAND bag!
NOTE: Little L (3 years old) will love playing with this! However, Little P (14 months old) would put it in her mouth, so this will be a no-no for her right now! While it smells great and isn't dangerous, she would not like how it tastes!
INGREDIENTS (so simple!)
• condition (yep… hair conditioner)
• cornstarch
• food coloring (optional - while it’s in the photo below, I did not use it this time)

DIRECTIONS
To make the cloud dough, you’ll need about 1 part conditioner to 2 parts cornstarch. I used one cup of conditioner and started with two cups of cornstarch.
Pour the conditioner in a bowl. I used an inexpensive brand and poured one cup of it into the bowl.

Add the cornstarch. I added one cup at a time and stirred. I actually added additional cornstarch to the mixture to achieve a soft dough that was not sticky.


Knead the mixture together until the conditioner and cornstarch are blended together and the dough is soft and smooth. I left this batch its natural color! It’s fun to do some of the activities described below when the dough is its “cloud” color!
I plan to bring food coloring to add to our cloud dough when we make it together next week. I’m guessing Little L will want to make some in her favorite color!
Another GRAND TIP! Add the food coloring to the conditioner before you add the cornstarch. You’ll need to add several drops, at least 8-10 for a more vibrant color. Once you’ve added to cornstarch, knead until blended.

Older Littles can even make this cloud dough on their own!
To compliment this experience,
here’s a perfect picture book to share with your Littles,
It Looked Like Spilt Milk by Charles G. Shaw.

The illustrations are a series of changing white shapes against a blue background.
and, as the ending reveals, are actually clouds in the sky!
Older Littles will be challenged to make
some of the shapes with their own cloud dough!
Here’s a Youtube video of the story!

How’s this for a SIMPLE (and calming) activity!
Do you remember laying in the grass and looking up at the clouds as a kid?
Share this experience with your own Littles!

Sometimes it’s just a “lay-in-the-grass-and-find-pictures-in-the-clouds” kind-of day.
Find our original Instagram post here!

This sweet photo of Little L reminded Laura of this fun activity!

These days, her little sister, Little P, is about the same age,
so a stack of paper/plastic cups will be packed in my GRAND Bag, too!
Never underestimate the fun (and benefits) your Littles can have
with a simple stack of paper cups!
Opportunities abound to improve hand-eye coordination, concentration
and problem solving skills!

While Little P (a toddler) will be challenged
by simply rolling the ball and knocking over the cups,
I’ve got a plan to challenge our preschooler, Little L, too!
Here are some fun ways for her to try to stack her cups
before she knocks them down!
The basics!

A few more challenging formations!

Add some pieces of paper for another layer of fun!

Let your older Littles come up with their own ideas, too!

Okay! While we realize this post highlights a Thanksgiving game, it can easily be adapted for oodles of fun any time! Set up a pyramid of cups in the classic formation (or any of those above) and see who can knock down the most with three rubber bands! You can even make this a competition!
Find our Instagram post here!

Knowing how to play a few simple card games
will come in handy when spending time with Littles!
All you’ll need is a deck of cards and two or more people to play!

During a recent weekend at the lake,
Laura and her grand nephew played this fun game.
Do you remember the card game, Garbage?
(Some people call the game, Trash.)
It was perfect for this GRAND and seven-year-old!

I’ve always wondered how this card game got its name
so I did a bit of investigating.
Google says that the card game name
came from the fact that players initially hold a hand of face-down cards
(which refers to the garbage or trash).
The goal is to be the first player
to get rid of all the garbage (face-down cards)
by replacing them with correctly numbered cards from the deck.
SET UP
Each player receives ten cards, face down, arranged in two rows of five.
The remaining cards are put in a draw pile, face down, in the middle of the table. To create a discard pile, the top card is turned over and placed upright next to the draw pile.
TO PLAY
Players take turns drawing one card from the draw pile or the discard pile.
If the drawn card is a number (Ace through 10), it’s placed in its corresponding spot (i.e. an Ace goes in the first spot, a 2 in the second and so on).
The card previously in that spot is flipped over. If the flipped card can be played elsewhere on the player’s “board”, it’s placed in that spot and then the card previously in that spot is flipped over. This process repeats until one of the following scenarios happens.
• If a player draws a Queen or King, their turn ends.
• If a player draws a Jack or a Joker, it’s a “WILD” card and can be placed in any
open spot and the process continues.
• If a player draws a card that matches a spot already occupied by the correct card,
the drawn card is discarded and the turn ends.
The first player to complete their sequence of ten cards (Ace - 10) wins the round!

Older Littles will have fun playing subsequent rounds where the winner of the previous round starts with one fewer card in their layout. The ultimate winner is the player who has no cards left on their “board”.
A VARIATION TO PLAY WITH YOUNGER LITTLES!
Play with Aces - 5 only and also include the Jacks and/or Jokers (no 6-10 or Queens or Kings). Play as described above with only one row of cards per player, Ace-5 and without the Queens or Kings to stop a turn. Once Littles are comfortable with this version, add in the Queens and Kings for extra fun!

Here’s a Youtube video we found that provides the details!

In this Instagram post we shared a holiday version
of the card game, Spoons,
where candy canes were used instead of spoons!
For a summer version of the game,
you could play with fun swizzler sticks,
popsicle sticks or lollipops!
If you need a basic review of this card game, here you go: Begin by dealing 4 cards to each player. The dealer begins the first round by passing the cards from the deck around the circle of players. Each player tries to collect four of a kind. When someone is holding four of the same number/face card, they quietly grab a spoon from the center of the table. There’s one less spoon than players, so the last person - the one without a spoon - loses the round and gets a letter toward spelling “SPOON”. The last player remaining wins.

Our final activity is super simple
but alwys a favorite of preschool Littles!
Paint their nails? OH YES!!!
Check out Laurie's Little's manicurist skills!

Washable markers are great for preschool Littles who want to paint their nails. They can explore with colors and designs and wash them right off! Don’t be surprised when your Littles want to go back to this activity over and over again!

Don’t forget to let them paint YOUR nails as well!

Did you happen to see our IG post from earlier this week?
THANK YOU, Target, for bringing back your $1 band aids to Bullseye Playground!
Laurie loves having these around for her Littles to play with!

I love having packs of these around for my Littles to play with. They are inexpensive so I don’t mind it when my grandkids use them on their many real or pretend owies or when they play doctor on their toys.

The band aids are not quite as sticky as brand names, so they come off easily (they are a little thicker). The different pictures on them make them fun to choose from, and they stand up to “on, off, on, off”!

Such wonderful fine motor fun for young Littles!

Thanks again for stopping by!
We hope that one or more of our activities got you thinking
about all the fun you and your Littles can have together this summer
(or anytime for that matter)!

If you missed any of the past five weeks of ideas
filled with GRAND SUMMER FUN
you can find these past posts by scrolling down our Home Page here.
If you like what you are reading and would like more ideas headed your way,
please consider subscribing to our blog.
It’s easy to sign up - just click on the link on the line above!
so remember to check us out or even follow us there!!
Finally, do you know any GRANDS like us or others who love the Littles in their lives
and who might find our site helpful?
If so, please share this site with them.
Please take a moment and comment below if you have any ideas or suggestions for us!

We’ll be back next Thursday with more GRAND Summer Fun!
Summer and flip flops…
There’s not much better
UNLESS
It’s summer, flip flops and sweet Littles!
And… remember


SPECIAL THANKS TO THE FOLLOWING SITES FOR FEATURING OUR POST!
Weekend Traffic Jam Reboot from Scratchmade Food for Hungry People
A Morning Cup of Joe from The Cottage Market
Busy Monday from A Pinch of Joy
You are the Star from Butterfly in the Attic
Thank you for featuring this post on your sites!
❤ We love our blogging community! ❤
💗 We are delighted to join the following link up parties and blog hops! 💗
MONTHLY
SUNDAY
MONDAY
TUESDAY
WEDNESDAY
THURSDAY
FRIDAY
SATURDAY


Such fun for the littles. You always are so creative with games and fun activities. a Thanks for sharing at Love Your Creativity.
The cloud dough looks really simple to make, I'll ahve a go next week when I'm with my grandsons. Got to love a good pair of flip flops escpeically with painted toes.
Thanks for joining in with #pocolo
Look at all this summer fun! I just love it. These activities seem so fun, and what a great way to spend time together—having fun and learning! Thank you so much for sharing your wonderful posts at The Crazy Little Lovebirds link party. I hope you will join us again this Friday.
Steph@CrazyLittleLovebirds
I saved this post for ideas to go with my granddaughters. So fun! Summa….slow down!
Fun activities - I love the photo of little legs covered in cool bandaids.