


paper plate fun! how to play the GRAND way!
Updated: Sep 2
Friday, August 21, 2026

Welcome back to Our Grand Lives!
As the days grow a bit shorter
and yellow school buses begin rolling down our neighborhood streets,
it’s a gentle reminder that a new season is on the horizon!
Back-to-school lists may be making their way onto the refrigerator,
calendars may be filling up,
and everyone may be getting ready for a new routine!
As Grands, we’re often called upon during these busy days, to lend a helping hand when our Littles need a little extra care — whether it’s an occasional afternoon together, a day when childcare falls through, or simply some special one-on-one time before the new school year begins..
And while we certainly don’t need to entertain our Littles every minute,
it’s nice to have a few fun ideas tucked away for those times when we hear,
“What can we do?”
Never fear!
Sometimes the best solutions are already waiting at home!
Today we're sharing our third post in our series
How to Play the GRAND Way!
We love celebrating the simple joy of turning everyday items
into extra-fun experiences!
In June, we kicked off this series with our post Fun with Foil!

It’s amazing what you can do with a roll of tin foil!
Then, in July, we turned to an item that helped us all cool off,
by featuring Spray Bottle Fun!

Today, we’ve got our third installment for you!

One of the things we love most about our How to Play the GRAND Way series, is that we take ordinary household items — things you probably already have on hand — and look at them through the eyes of a Little. With a little imagination, these everyday items can become invitations to explore, create, discover, and, most importantly, PLAY!
So, before we turn the page to a new season,
let’s make room for another round of GRAND play!
And this time, we're bringing something from the kitchen to the fun…
So, grab your Littles and a plate (or two!) and let’s see what happens
when we think beyond the dinner table!

It’s Time to Fill Our Plates… with Play!

Why We Love Paper Plates!
Of course, plates are made for holding food,
but who says that’s all they can hold?

Paper plates are one of the most versatile, budget-friendly items you can keep in your play toolkit, plus they are often recyclable!
We tend to always have a pack of basic paper plates available or, at least, a few leftovers after a party or gathering..
No surprise!
Paper plates are great to have around for many well known uses…
Housing art supplies, as a sorting tool, when having an impromptu picnic or as a drying rack for a special project! These are all great uses for paper plates.

However, with a little imagination, a paper plate can also become a canvas, a game board, a prop, a tool for exploring, or the starting point for all kinds of playful adventures!
Here are some of our favorite ways to play with paper plates!
Paper Plate Tennis (or PIckleball)!
Laura and her Littles have played this game multiple times,
first last winter on a snowy day and then, again,
while indoors on a hot muggy day!

Paper plate tennis (or pickleball) is a simple but very engaging indoor game young Littles can play, using paper plates as their rackets and a balloon as the ball!
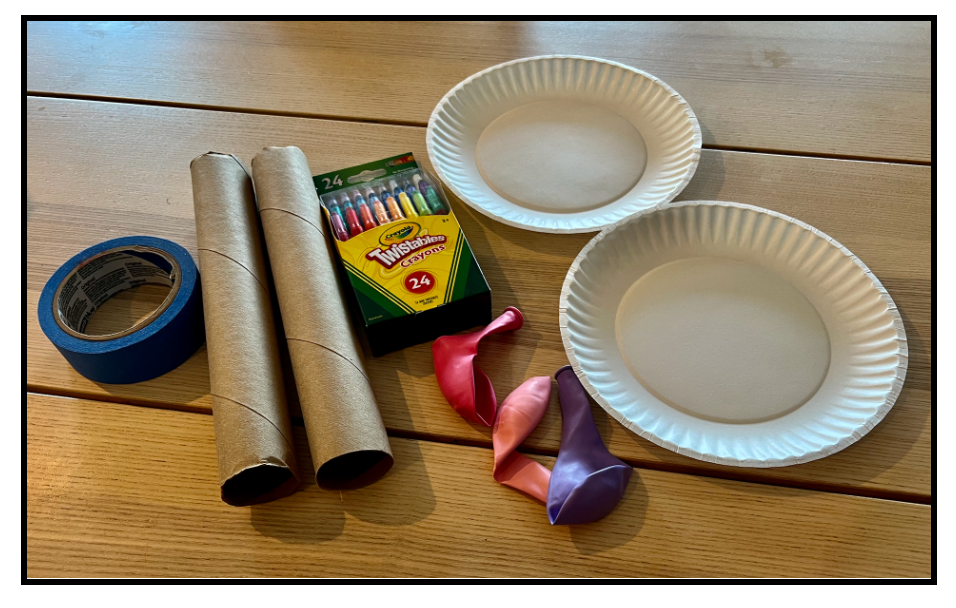
Our Littles had fun decorating their paddles with crayons.


Once our Littles had finished their decorations,
we simply taped a paper towel tube to the back of each plate.
(NOTE - We cut each tube shorter for our young Littles.)

That’s it! Our Littles were ready to play!

Feel free to play with or without a net!
We played with and without a “net” to divide both sides.
We put two chairs up with a ribbon between them,
but we quickly realized that our youngest Little was most successful
without the net and, as you can see, neither Little needed one to have fun!
One more memory from this activity!
Always take advantage of the silly moments that come your way...
they make the best memories!
We, of course, needed to do this, over and over again!
I love these giggles!
Squish & Twist!
Here’s a fun - and simple - art project that Laura and her Littles loved!

This activity is a fun way to explore color mixing! Each Little will need 2 white paper plates (we used the smaller, luncheon ones that had a bit of a lip on them). Turn the two plates upside down and then let your Little choose two colors of paint from three that are offered - red, yellow, blue. Add a few drops of the first color to one of the plates and then follow with a few drops of the second color. At this point, ask your Little to predict (or make his/her best guess) - what color will he/she end up with?

Carefully place the second plate on top of the first, so that the bottoms of each plate are together with the paint between them. Depending on your Little’s age, he/she may need some help picking the plates up and pressing them together as shown. When ready, have your Little “squish and twist” over and over again (for about 10-15 seconds). Of course, we were twisting and shouting as we did this step!
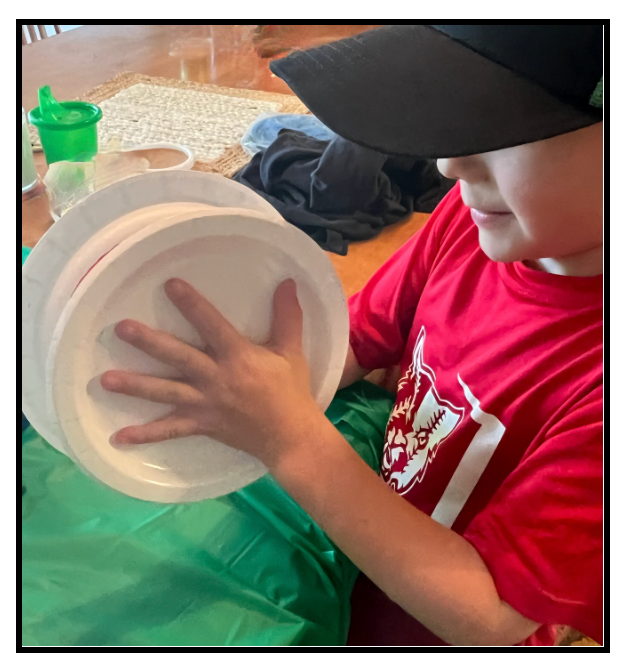
Then pull the plates apart
(this is when having the ones with the lips around the edges really helps)
and…
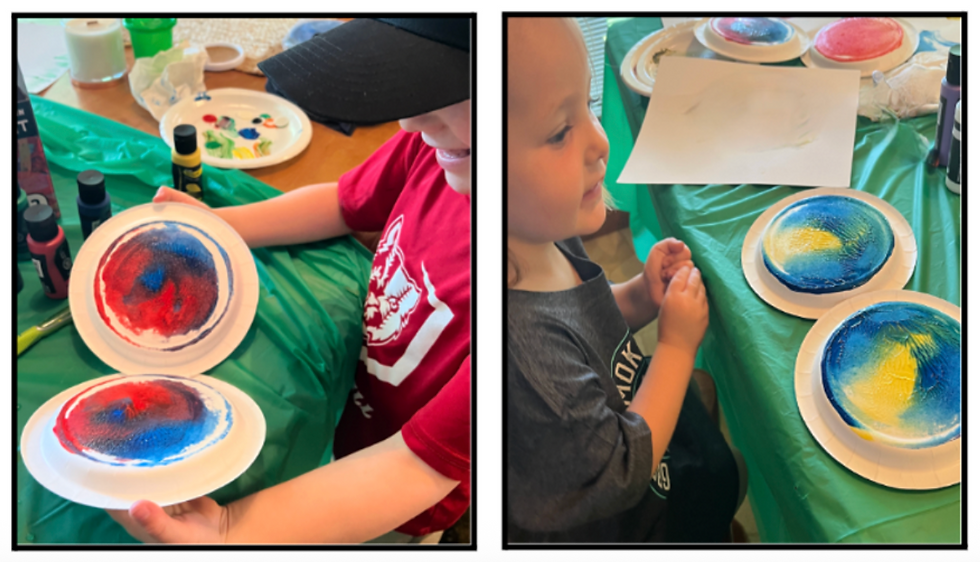
Voila!
Did your Little predict correctly?
A Paper Plate Walk!
Here’s a fun twist that Laurie added to a recent walk with her Littles!

This was an easy way to make our walk challenging for each Little! Little D (who is 5 years old) used her paper plate to look for ABC objects on our walk that began with different letter sounds, while Little P (2 1/2 years old) had the job of finding objects that were different colors!
Beforehand, I wrote the ABC’s around the rim of one paper plate (for Little D) and then I drew sections of several colors around the rim of another (for Little P). I cut notches between each letter/color.

When we headed out for our walk, each Little had their assignment! As each Little found an object that matched an area on her plate, she would turn down that notch. The goal was to turn down every letter/color while on our walk!
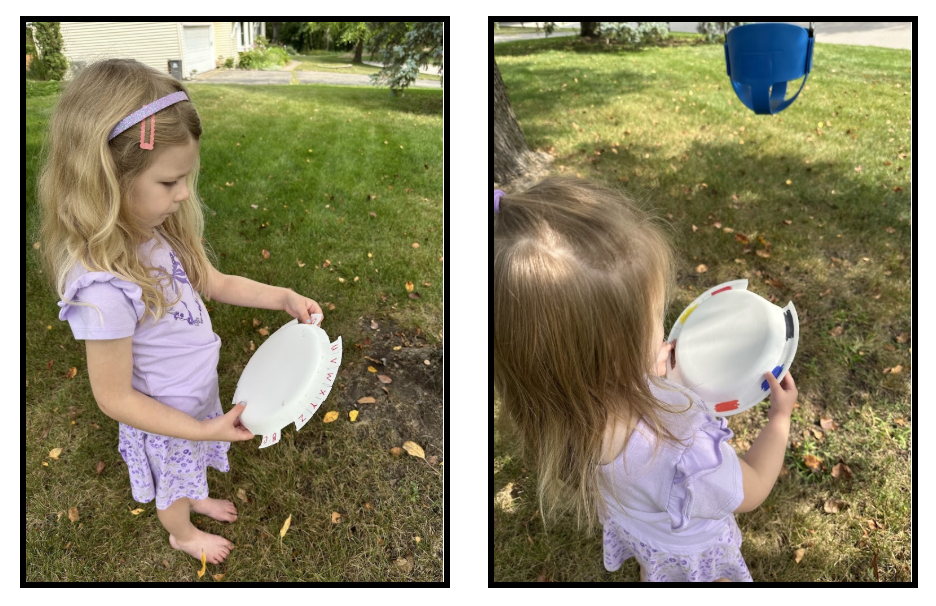
It was trickier than you’d think!


Paper Plate Target Practice!
This was an activity that required some hand-eye coordination!
Laura’s Littles found it challenging but, oh so, fun!

To set up this activity, I cut out the middle of each paper plate, creating a hole large enough for a ball to pass through. We also strung lengths of painter’s tape between two chairs, crisscrossing the tape as we did so. Finally, we stuck the paper plate targets to the tape, as shown.
We used these balls (ones I’ve used over and over again) but bean bags or small stuffed animals would work just as easily!
Our Littles are young enough that they had fun simply throwing the balls at the holes. In fact, at their ages, it was fun to run up to the paper plates and throw the balls through the holes! In fact, they had just as much fun racing to pick up all the balls when it came time to clean up, too!
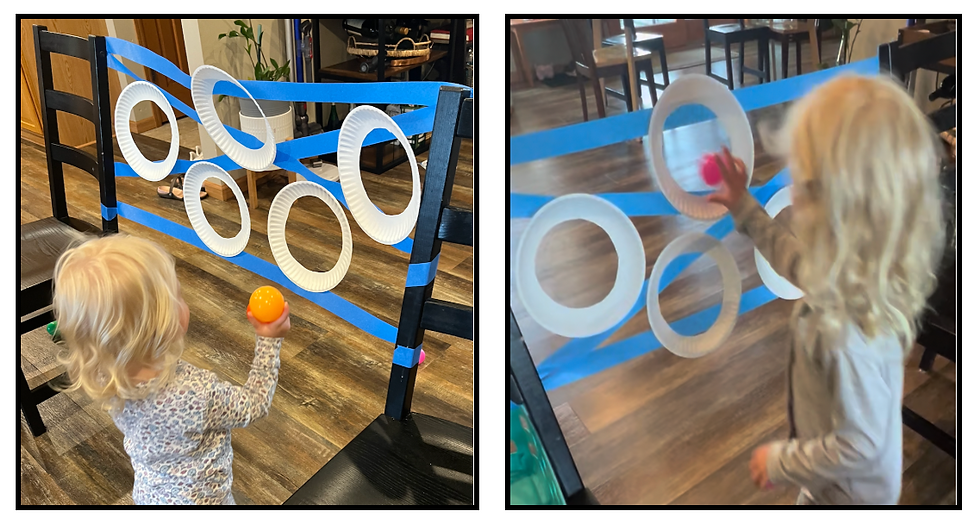
To challenge older Littles, you could put a piece of tape on the floor to mark where they should throw from and you could add a number to each plate, indicating points earned with each throw!

We told you that you could do a lot with paper plates!
In fact, we even have more faves to share below!
✽ Drop That Ball!
So, for this low-prep activity, Laurie grabbed a paper plate and turned it into a fun eye-hand coordination activity! It’s a great way to channel that extra energy while encouraging Littles to slow down, settle in, and focus.

Each Little will need one paper plate for this activity. Beforehand, cut a hole in each paper plate - one that allows a ball (any size you have) to fall through. You’ll also need 2-3 plastic cups for each Little.
Your Little will place the ball on the plate, and using both hands, roll the ball around on the plate. The goal is to “drop the ball” through the hole and into one of the cups!

Older Littles can race to accomplish this or, as an extra challenge, to be the first one to get one ball in each cup!
✽ Let’s Make Some Noise!
What Little doesn’t love making a lot of noise? One year, Laura and her Littles made these noisemakers to celebrate the 4th of July! All you need are white paper plates, art supplies (paints, crayons, markers, stamps, stickers and ribbon, etc) to decorate each plate, a stapler and some noisemakers… large noodles work really well and are safer options for younger Littles! While we decorated ours with red, white and blue art supplies, your Little can use whatever supplies you have on hand or the supplies can reflect a special event or holiday, too.
We folded the paper plate(s) in half first and then unfolded. We only decorated one side of the plate. While we painted ours, feel free to decorate the noisemaker however your Little would like... markers, crayons and stickers work well, too! Once the paint had dried (or the decorations were completed) we partially stapled around the edges of the paper plate folded in half, added some dry pasta inside (we used penne) and then finished stapling around the edges. Noisemaker done!

I added a ribbon so the Littles could easily carry their noisemakers!

✽ Purses, Baskets & Hats!
Littles love to carry things - and wear things - so why not turn a paper plate into a purse, a basket or even a hat?

Here are two ideas for doing so! For the purse (or basket), cut a paper plate in half, decorate it with markers or stickers, staple both sides of the curved edges together and add a ribbon to both ends of the straight edge. To make a hat or crown, cut out the center of the plate and then decorate the outer edges, as shown above.
✽ Lace It Up!
These spider webs were fun to make during Halloween season! Use a paper punch to punch holes around the outer rim of a paper plate. Then lace string through the holes, crisscrossing across the plate, as you do so.

Tape off the string when you first begin and then when you're done crisscrossing, too.

Add a plastic spider or two for added fun!

You can always change up how you are lacing the paper plate!
Make a dreamcatcher,
or an apple (lace red yarn and then add a paper stem and leaf).
Cut a large heart out of the center of a plate,
punch holes along the heart's border, and let Littles lace yarn or ribbon through!
NOTE: Speaking from experience,
this project is fun to make as. part of a classroom holiday party!
✽ Paper Plate Masks!
Paper plates make awesome (and easy!) masks! Laura and her Littles made these masks a few years ago when they put on a play, Goldilocks and the Three Bears.

To make these, we cut a hole in the center of each plate, decorated the plate to represent each character and attached a craft stick at the base to hold on to!
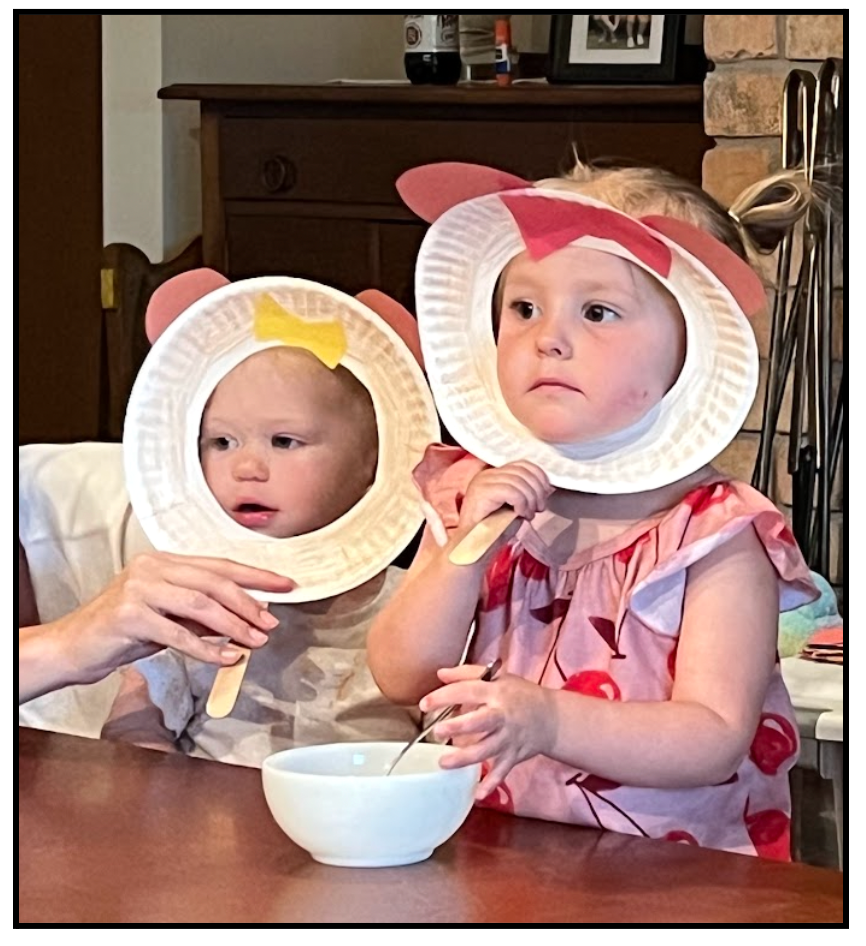
Look at our cute Baby Bear and Mama Bear!

Do you have any fun possibilities to add to our paper plate ideas?
If so, we’d love to hear more!
Please share your thoughts in the comments section at the end of this post!
where we post regularly, too!
We invite you to follow us there!
We’ll be back early next week with one more post
before we take a short end-of-summer break.
Please come back and join us for our post,
This or That! Summer 2026 Edition!
You won’t want to miss it!
And, don’t forget, you can always sign up to subscribe to our blog!
That way, you won’t ever miss out!!

As we head into a new season, we hope you’ll tuck a few of these ideas away in your own GRAND bag of tricks! Because play doesn’t need a special season, a special place, or a house full of special supplies.

Sometimes, all it takes is something as simple as a paper plate, a willing Little, and a Grand who is ready to play!
And, speaking of plates…
we’ll leave you with this little wish - from us to you!

SPECIAL THANKS TO THE FOLLOWING SITES FOR FEATURING OUR POST!
A Morning. Cup of Joe from The Cottage Market
Home Matters from Days Filled with Joy
Wonderful Wednesday Blog Hop from Ducks 'n a Row
Thank you for featuring this post on your sites!
💗 💗 💗
💗 We are delighted to join the following link up parties and blog hops! 💗
MONTHLY
SUNDAY
MONDAY
TUESDAY
WEDNESDAY
THURSDAY
FRIDAY
SATURDAY


I can't believe all these ideas from just paper plates. I LOVE the squish & twist! These are all amazing. Thanks for sharing this with us at Will Blog for Comments #92. Looking forward to seeing what you'll share at #93, which opens Monday.
More creative ideas from you two all stars- love it! :)
So many wonderful paper plate ideas! The round shape and durable material makes it fun for the littles to use and handle. The spider web is my favorite. The cut out circle reminds me of the magic viewer on the old young children's TV show Romper Room!
Such fun ideas!! Now I just need some grandchildren, lol!! Thanks for joining in on Home Matters Linky Party! I will be featuring your post this week! #HomeMattersParty xx
OMG so many great ideas! But I have to say I loved, Drop that ball! Visiting from #MMBC